
Mastering Stream Security with Cloudflare: The Dynamic Duo of Ant Media Server and Cloudflare
Security is a top priority in media streaming apps. Using Cloudflare to enhance Ant Media Server offers another degree of security. Cloudflare, known for its strong Content Delivery Network (CDN) and security capabilities, plays a critical role in protecting important content and user privacy.
By combining Ant Media Server with Cloudflare, your streaming service enjoys faster speed, lower latency, and stronger defense against potential threats. This collaboration directly targets issues including unauthorized access, content theft, and Distributed Denial of Service (DDoS) attacks.
DDoS protection from Cloudflare provides continuous service availability by protecting against malicious traffic. Furthermore, the Web Application Firewall (WAF) protects your streaming service against potential threats.
Cloudflare’s use of SSL/TLS encryption ensures secure data transmission, which is critical for retaining user trust. This complete strategy not only improves security, but also contributes to a smooth and dependable streaming experience for your users.
In addition to Cloudflare, Ant Media Server provides a variety of security features to safeguard your streaming material. More information regarding Ant Media Server’s stream security features may be found here. These features create a secure streaming environment, demonstrating our commitment to offering robust content protection and service integrity solutions.
Integrate Cloudflare with Ant Media Server
Let’s go over the step-by-step guide on how to set up this powerful integration. In this integration, there are three components. As you guessed, two of them are Cloudflare and Ant Media Server. There is one more component, which is Nginx, between Cloudflare and Ant Media Server. Check the image below to see the relationship. Just pay attention that in this document, Nginx is running in the same instance with Ant Media Server.

Step 1: Configure Cloudflare
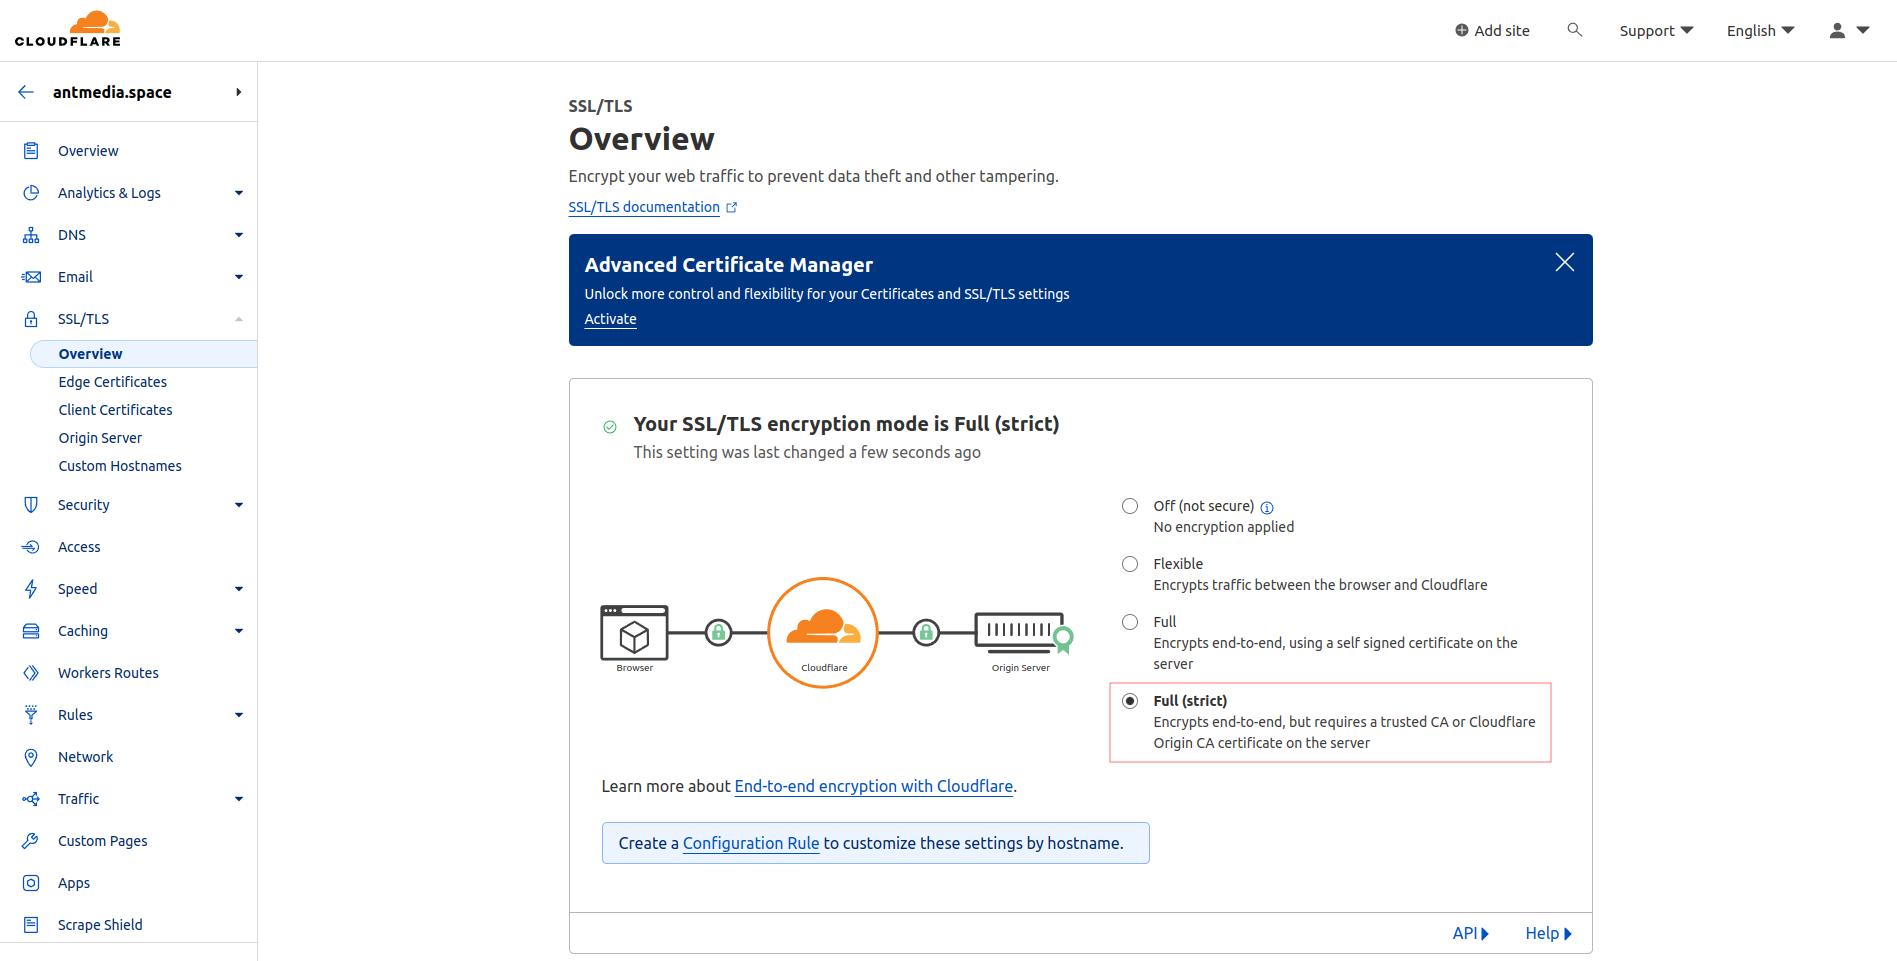
- After logging into Cloudflare, navigate to SSL > TLS > Overview, and set the SSL/TLS encryption mode to Full (strict)
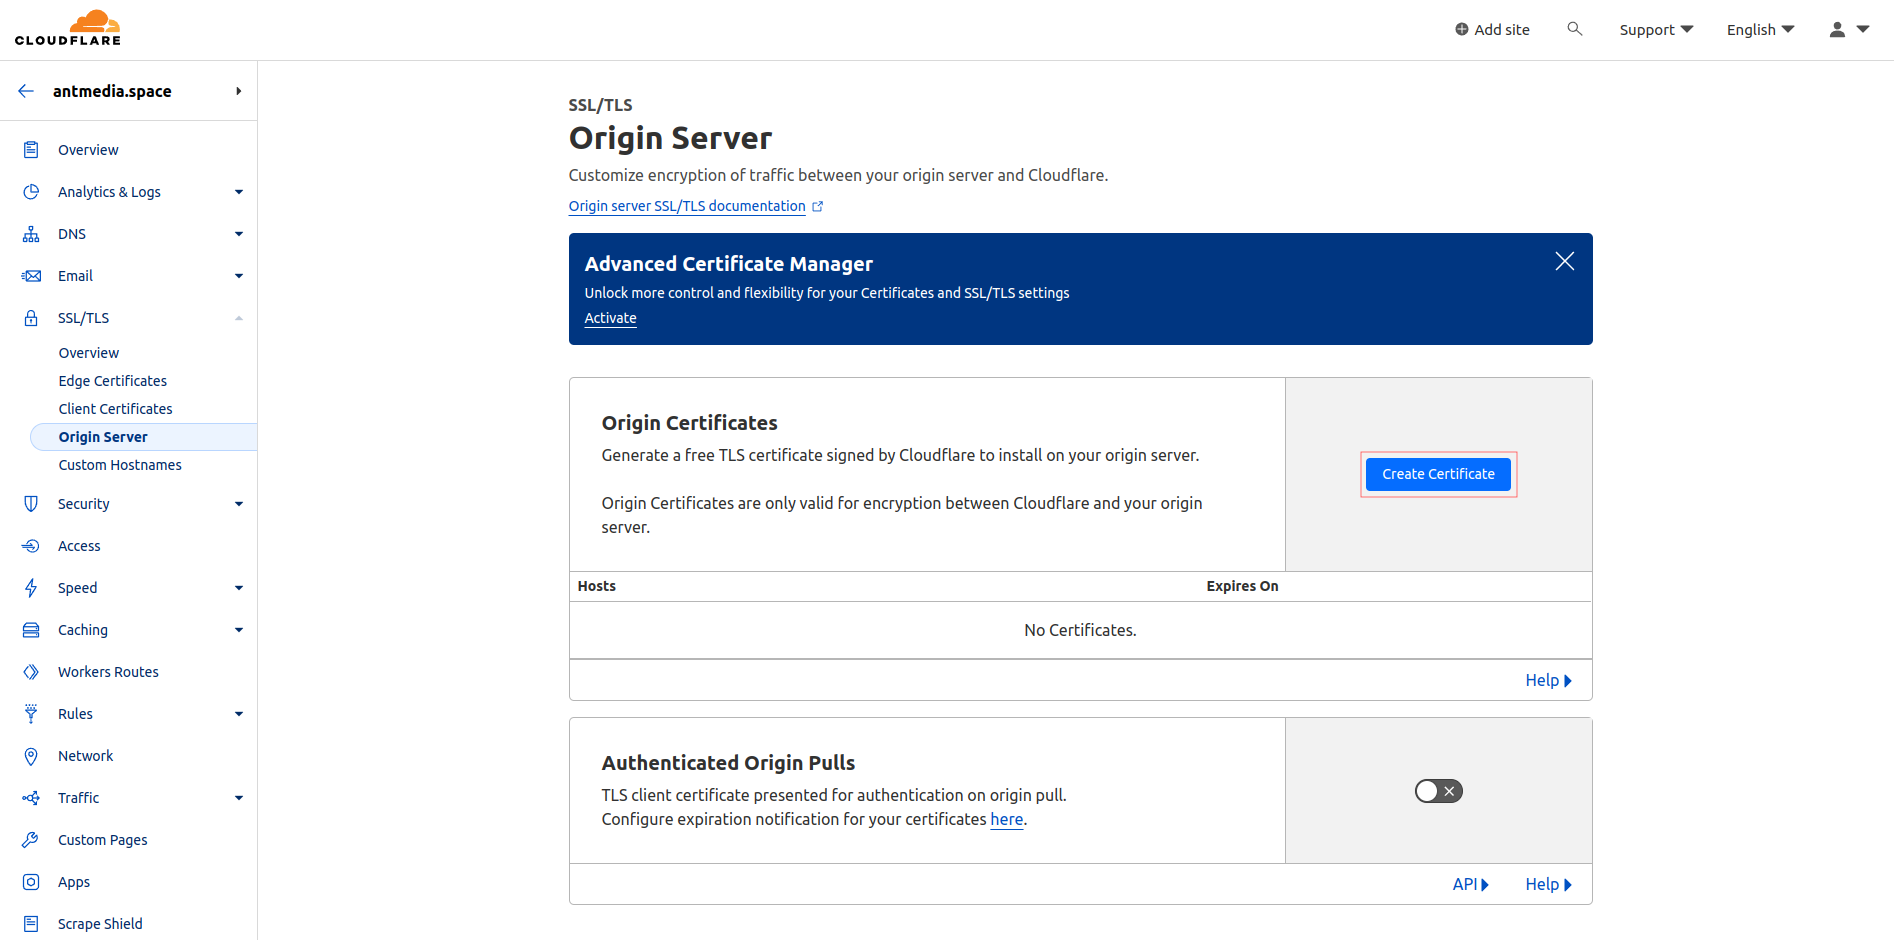
- Click on Origin Server in the same menu, go to Create Certificate, and after configuring the domain settings, click on Create
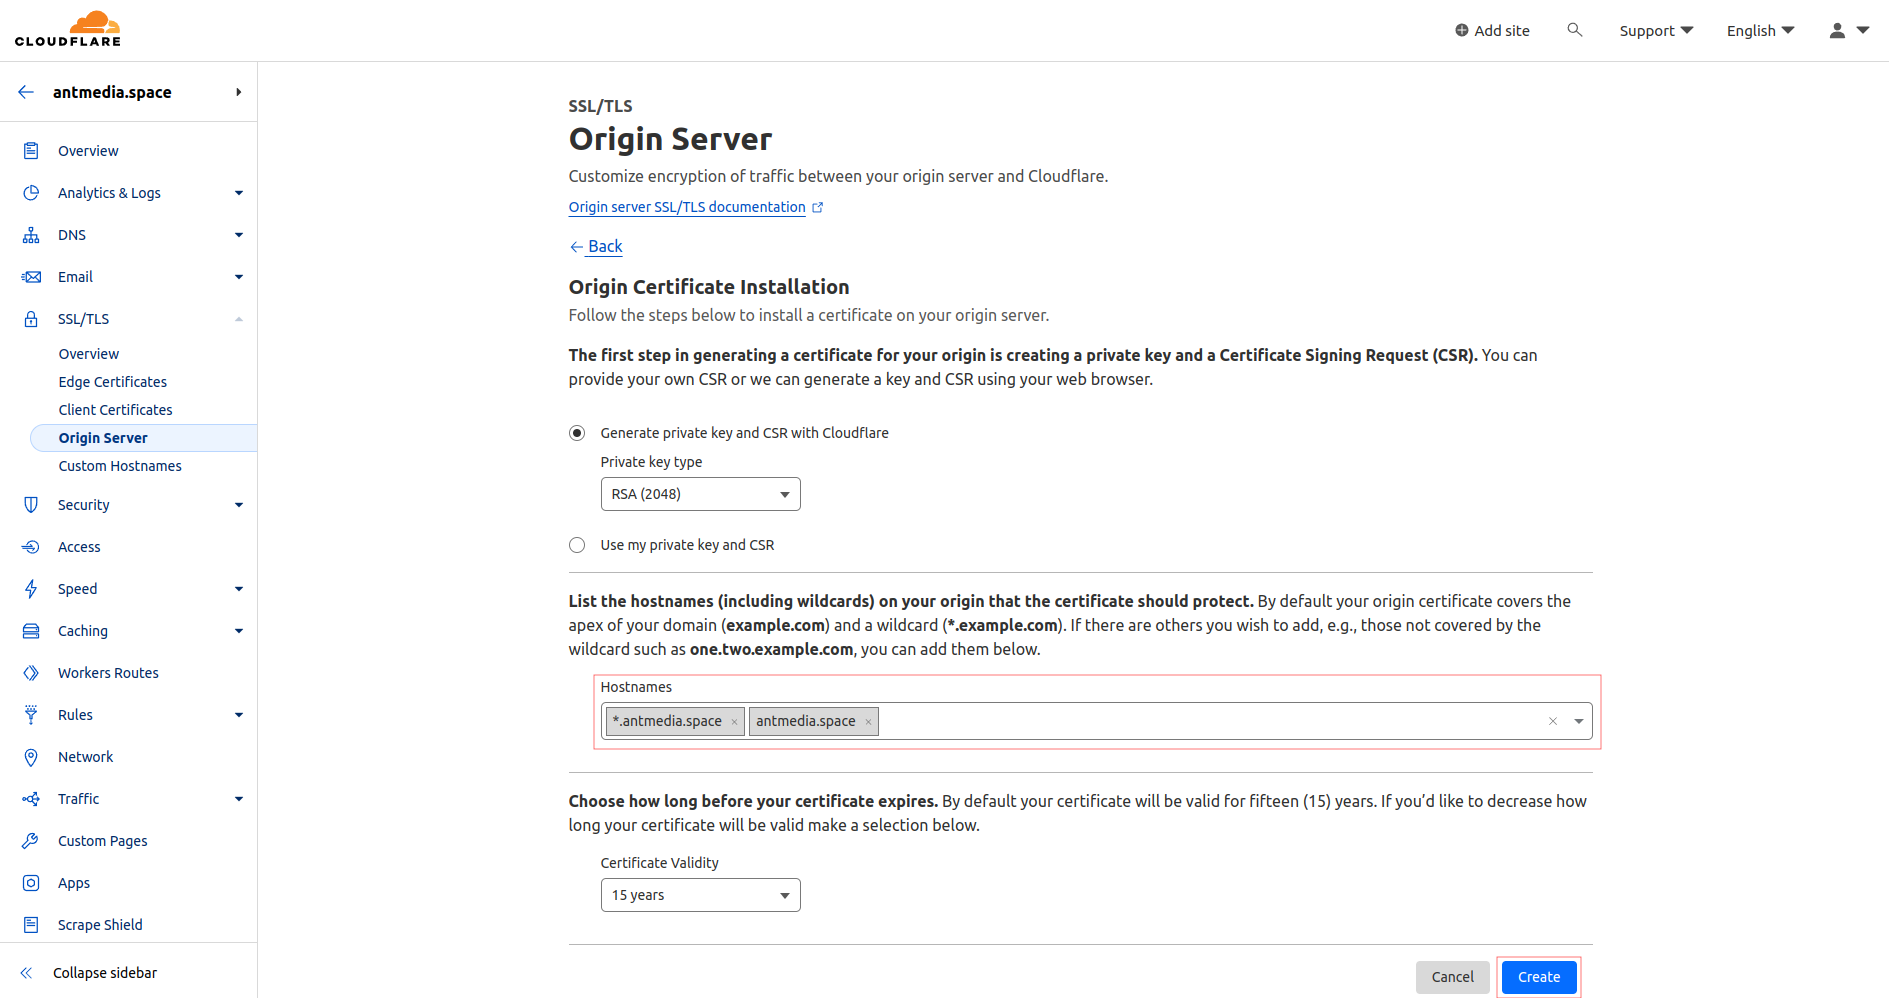
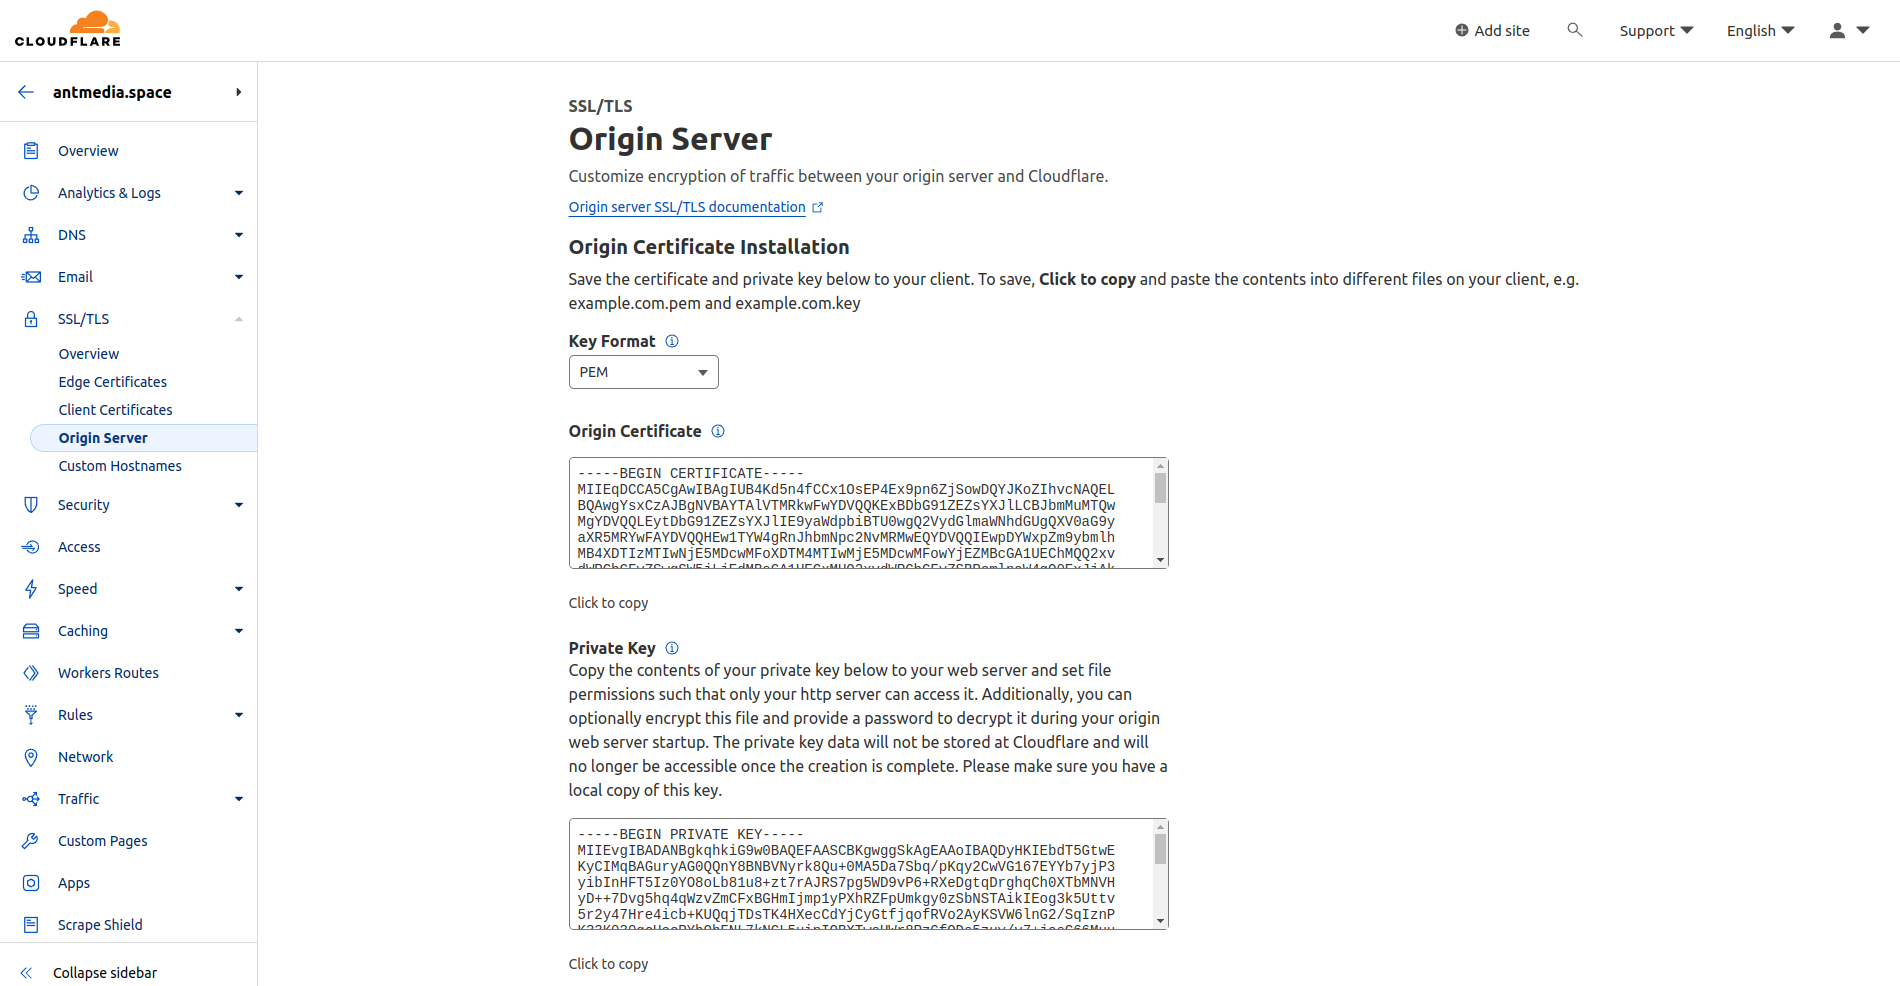
- Origin Certificate and Private Key will be generated; copy these two files to the server where you will install the Nginx server.
- Ensure the A record in DNS settings is set to Proxied (enabled)
Step 2: Configure Nginx
- Complete the installation of Nginx by following the instructions provided in this link.
- Copy your certificate and private key to the
/etc/nginx/ssl/directory:
mkdir /etc/nginx/ssl
cp -p origin.pem privkey.pem /etc/nginx/ssl/- Create a vhost configuration file:
vim /etc/nginx/conf.d/antmedia.confEdit and save the file with the following lines, customizing them with your information. Pay attention that we use antmedia.space as a domain name and proxy_pass is http://127.0.0.1:5080 because Ant Media Server is running in the same instance with Nginx.
server {
    listen 443 ssl;
    ssl_certificate /etc/nginx/ssl/origin.pem;
    ssl_certificate_key /etc/nginx/ssl/privkey.pem;
    server_name antmedia.space;

    location / {
        proxy_pass http://127.0.0.1:5080;
        proxy_http_version 1.1;
        proxy_connect_timeout 7d;
        proxy_send_timeout 7d;
        proxy_read_timeout 7d;
        proxy_set_header X-Forwarded-For $proxy_add_x_forwarded_for;
        proxy_set_header Host $host;
        proxy_set_header Upgrade $http_upgrade;
        proxy_set_header Connection "Upgrade";
    }
}- Verify the correctness of the configuration:
nginx -t- Restart the Nginx service:
systemctl restart nginxFinally, access the control panel with your domain. For our case, we type antmedia.space and we access the server web panel.
In conclusion
To summarize, the collaboration between Ant Media Server and Cloudflare is a significant force in improving the security of your streaming business. We developed a comprehensive defense against unauthorized access, content theft, and DDoS attacks by seamlessly integrating Ant Media Server’s robust features with Cloudflare’s cutting-edge CDN and security capabilities. The joint use of SSL/TLS encryption assures safe data transfer and user trust, resulting in a smooth streaming experience. Please see our documentation for a more in-depth look at Ant Media Server’s security features. Trust this dynamic combination to protect your material and ensure a stable streaming environment.
Reference Link : https://antmedia.io/mastering-stream-security-cloudflare/
GitHub Actions for CloudFormation Template Validation and Deployment
name: Ant Media Server Cloudformation Deployment

on:
  schedule:
    - cron: '0 0 * * 1'

jobs:
  deploy_cf_template:
    runs-on: ubuntu-latest

    env:
      AWS_REGION: eu-west-2
      STACK_NAME: cf-automation-test-stack
      ORIGIN_INSTANCE_TYPE: t2.large
      EDGE_INSTANCE_TYPE: t2.large
      MONGO_INSTANCE_TYPE: c5.large
      TEMPLATE_FILE: ${{ github.workspace }}/cloudformation/antmedia-aws-autoscale-template.yaml

    steps:
      - name: Checkout Repository
        uses: actions/checkout@v2

      - name: Configure AWS Credentials
        uses: aws-actions/configure-aws-credentials@v1
        with:
          aws-access-key-id: ${{ secrets.AWS_ACCESS_KEY_ID }}
          aws-secret-access-key: ${{ secrets.AWS_SECRET_ACCESS_KEY }}
          aws-region: ${{ env.AWS_REGION }}

      - name: Validate CloudFormation Template
        run: |
          aws cloudformation validate-template --template-body file://${{ env.TEMPLATE_FILE }}

      - name: Deploy Stack
        run: |
          aws cloudformation create-stack \
            --stack-name ${{ env.STACK_NAME }} \
            --template-body file://${{ env.TEMPLATE_FILE }} \
            --parameters ParameterKey=Email,ParameterValue=test@antmedia.io \
                         ParameterKey=KeyName,ParameterValue=${{ secrets.KEY_NAME }} \
                         ParameterKey=OriginInstanceType,ParameterValue=${{ env.ORIGIN_INSTANCE_TYPE }} \
                         ParameterKey=EdgeInstanceType,ParameterValue=${{ env.EDGE_INSTANCE_TYPE }} \
                         ParameterKey=MongoDBInstanceType,ParameterValue=${{ env.MONGO_INSTANCE_TYPE }} \
                         ParameterKey=LoadBalancerCertificateArn,ParameterValue=${{ secrets.SSL_CERTIFICATE_ARN }} \
                         ParameterKey=AntMediaEdgeCapacity,ParameterValue=1 \
            --capabilities CAPABILITY_IAM CAPABILITY_NAMED_IAM \
            --region ${{ env.AWS_REGION }}
          timeout=$((SECONDS+420))
          while [ $SECONDS -lt $timeout ]; do
            sleep 10
            stack_status=$(aws cloudformation describe-stacks --stack-name ${{ env.STACK_NAME }} --query 'Stacks[0].StackStatus' --output text 2>&1)
            if [ "$stack_status" == "CREATE_COMPLETE" ]; then
              echo "Stack creation completed successfully."
              break
            elif [ "$stack_status" == "ROLLBACK_COMPLETE" ] || [ "$stack_status" == "CREATE_FAILED" ]; then
              echo "Stack creation failed or rolled back."
              exit 1
            fi
          done

      - name: Display Stack Outputs
        run: |
          outputs=$(aws cloudformation describe-stacks --stack-name ${{ env.STACK_NAME }} --query 'Stacks[0].Outputs' 2>&1)
          status=$?

          if [ $status -ne 0 ]; then
            echo "Failed to describe stack: $outputs"
            exit 1
          elif [ "$outputs" == "null" ]; then
            echo "Stack Outputs are null. Deployment failed."
            exit 1
          else
            echo "Stack Outputs: $outputs"
          fi
      - name: Delete Stack
        if: ${{ always() }}
        run: |
          aws cloudformation delete-stack --stack-name ${{ env.STACK_NAME }}
          aws cloudformation wait stack-delete-complete --stack-name ${{ env.STACK_NAME }}
https://github.com/ant-media/Scripts/blob/master/.github/workflows/antmedia-cf-template-validation-test.yml
coTURN installation script
#!/bin/bash

# Check if user is running as root
if [[ $EUID -ne 0 ]]; then
    echo "This script must be run as root."
    exit 1
fi

# Function to install Coturn
install_coturn() {
    apt-get update
    apt-get install -y coturn
    truncate -s 0 /etc/turnserver.conf
}

# Function to generate random username
generate_credentials() {
    username=$(tr -dc 'a-zA-Z0-9' < /dev/urandom | fold -w 8 | head -n 1)
    password=$(tr -dc 'a-zA-Z0-9' < /dev/urandom | fold -w 12 | head -n 1)
    echo "Username: $username"
    echo "Password: $password"
    echo "lt-cred-mech" >> /etc/turnserver.conf
    echo "user=$username:$password" >> /etc/turnserver.conf
}

# Function to configure Coturn for NAT network
configure_nat() {
    # Add necessary configuration options for NAT network
    echo 'TURNSERVER_ENABLED=1' >> /etc/default/coturn
    # Get public IP
    public_ip=$(curl -s http://checkip.amazonaws.com)

    # Get private IP
    private_ip=$(hostname -I | awk '{print $1}')

    # Add external IP configuration to turnserver.conf
    echo "external-ip=$public_ip/$private_ip" >> /etc/turnserver.conf
    echo "realm=$public_ip" >> /etc/turnserver.conf
}

# Function to configure Coturn for public IP
configure_public_ip() {
    # Add necessary configuration options for public IP
    echo 'TURNSERVER_ENABLED=1' >> /etc/default/coturn

    # Get public IP
    public_ip=$(curl -s http://checkip.amazonaws.com)

    # Add external IP configuration to turnserver.conf
    echo "realm=$public_ip" >> /etc/turnserver.conf
}

# Main script

# Prompt user for configuration option
echo "Choose the configuration option:"
echo "1. Behind NAT network (e.g., AWS)"
echo "2. Directly accessible public IP"
read -p "Enter your choice (1 or 2): " option

case $option in
    1)
        install_coturn
        generate_credentials
        configure_nat
        ;;
    2)
        install_coturn
        generate_credentials
        configure_public_ip
        ;;
    *)
        echo "Invalid choice. Exiting."
        exit 1
        ;;
esac

# Start and enable Coturn service
systemctl restart coturn
systemctl enable coturn

echo "Coturn installation and configuration completed."
How to backup/restore Route53 records by using aws-cli
# To backup records
aws route53 list-resource-record-sets --hosted-zone-id YOUR_HOSTED_ZONE_ID > route53_backup.json
# To restore records
aws route53 change-resource-record-sets --hosted-zone-id YOUR_HOSTED_ZONE_ID --change-batch file://route53_backup.json
[Gitlab] urllib3.exceptions.ReadTimeoutError: HTTPConnectionPool(host=’docker’, port=2375): Read timed out.
Aşağıdaki hatanın nedeni gitlab registery ‘de push işleminin uzun sürmesidir.
urllib3.exceptions.ReadTimeoutError: HTTPConnectionPool(host='docker', port=2375): Read timed out.
.gitlab-ci.yml dosyasına docker için timeout eklemeniz yeterli olacaktır.
variables:

  DOCKER_CLIENT_TIMEOUT: 300

  COMPOSE_HTTP_TIMEOUT: 300
Error: INSTALLATION FAILED: create: failed to create: Secret “sh.helm.release.v1.muratws.v1” is invalid: data: Too long: must have at most 1048576 bytes
Helm’de bu hatayı almanızın nedeni aslında repositoryunuz içinde istenmeyen dosyaların/dizinlerin olmasıdır. Gereksiz dosyaları silip tekrar helm package komutunu çalıştırabilirsiniz.
Sevgiler.
Minikube: Exiting due to GUEST_MISSING_CONNTRACK: Sorry, Kubernetes 1.23.3 requires conntrack to be installed in root’s path
Bunun için sadece conntrack paketini yüklemeniz yeterlidir.
apt-get install -y conntrack
Eğer minikube ‘ı sanal bir makinada çalıştırıyorsanız driver olarak none seçmelisiniz.
minikube start --driver=none
Ayrıca minikube start –force –driver=docker ile sanal makina üstünde bile çalıştırabilirsiniz.
Sevgiler.
OpenVPN ‘de kullanıcıyı deaktif etme
-
./easyrsa revoke kullanici_adi
-
cp /usr/share/EasyRSA-3.0.8/pki/crl.pem /etc/openvpn/server/
-
systemctl restart openvpn
https://registry.gitlab.com/v2/: x509: certificate signed by unknown authority hatası
Eğer gitlab CI üstünde docker süreçleriniz varsa ve kendi gitlab-runner ‘nızı kullanıyorsanız ve aşağıdaki sertifika hatasını alıyorsanız kendi tarafınızda bazı değişiklikler yapmalısınız.
time="2022-03-19T05:30:18Z" level=info msg="Error logging in to v2 endpoint, trying next endpoint: Get https://registry.gitlab.com/v2/: x509: certificate signed by unknown authority"Get https://registry.gitlab.com/v2/: x509: certificate signed by unknown authority
/etc/gitlab-runner/config.toml dosyasında kendi runner ‘nızı bulup aşağdaki satırlara göre düzenleyin.
tls_verify = falseprivileged = true
.gitlab-ci.yml üstünde aşağıdaki satırları ekleyin
variables:DOCKER_TLS_CERTDIR: ""
Vim ‘de global olarak visual özelliğini kapatmak
vim /usr/share/vim/vim81/defaults.vim
# Aşağıdaki satırı
if has('mouse')
set mouse=a
endif
# Bu satırla değiştirin.
if has('mouse')
set mouse-=a
endif
Sevgiler.